Memory-Mapped Files in Python 3: A Comprehensive Guide
Related Articles: Memory-Mapped Files in Python 3: A Comprehensive Guide
Introduction
In this auspicious occasion, we are delighted to delve into the intriguing topic related to Memory-Mapped Files in Python 3: A Comprehensive Guide. Let’s weave interesting information and offer fresh perspectives to the readers.
Table of Content
- 1 Related Articles: Memory-Mapped Files in Python 3: A Comprehensive Guide
- 2 Introduction
- 3 Memory-Mapped Files in Python 3: A Comprehensive Guide
- 3.1 Understanding Memory-Mapped Files
- 3.2 The Benefits of Memory-Mapping
- 3.3 The mmap Module in Python 3
- 3.4 Practical Examples
- 3.5 Frequently Asked Questions (FAQs)
- 3.6 Tips for Effective Memory-Mapping
- 3.7 Conclusion
- 4 Closure
Memory-Mapped Files in Python 3: A Comprehensive Guide

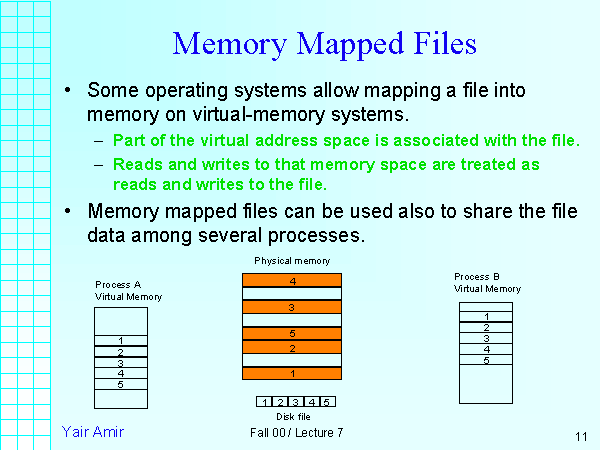
Memory-mapped files, often referred to as mmap, provide a powerful mechanism in Python 3 for interacting with large files efficiently. This technique allows a portion of a file to be mapped directly into the process’s memory space, enabling direct manipulation of the file’s contents without the need for explicit read and write operations. This approach significantly enhances performance, particularly when dealing with large datasets or files that require frequent access.
Understanding Memory-Mapped Files
At its core, memory-mapping establishes a direct link between a file on disk and the process’s virtual memory. This link allows the operating system to treat a portion of the file as if it were a contiguous block of memory within the process. This eliminates the overhead associated with traditional file I/O operations, where data is read from the disk into memory and then written back to the disk. Instead, the operating system manages the data transfer between the file and memory transparently.
The Benefits of Memory-Mapping
Memory-mapped files offer several significant advantages over traditional file I/O methods in Python 3:
-
Performance Enhancements: The most prominent advantage of memory-mapping is its ability to drastically improve performance for file-related operations. By eliminating the need for explicit read and write operations, memory-mapping significantly reduces the number of system calls and data transfers between memory and disk. This results in faster processing times, especially when dealing with large files.
-
Efficient Data Access: Memory-mapped files allow for direct access to any byte within the mapped region. This eliminates the need to sequentially read through the file to reach a specific location, making random access operations significantly faster.
-
Reduced Memory Footprint: Memory-mapping only loads the necessary portion of the file into memory, reducing the overall memory footprint compared to loading the entire file into memory at once. This is particularly beneficial when dealing with massive files that would otherwise consume significant amounts of memory.
-
Simplified File Manipulation: Memory-mapping simplifies file manipulation by treating the mapped file as a modifiable memory buffer. This allows for direct modification of the file’s contents, eliminating the need for separate read and write operations.
The mmap Module in Python 3
Python 3 provides the mmap module to facilitate memory-mapped file operations. This module offers a simple and intuitive interface for creating, accessing, and manipulating memory-mapped files.
Key Functions and Classes:
-
mmap.mmap(fileobj, length, access=ACCESS_WRITE, offset=0, tagname=None, flags=MAP_SHARED): This function creates a new memory-mapped file object.-
fileobj: A file-like object representing the file to be mapped. -
length: The size of the file region to be mapped in bytes. -
access: Specifies the access mode for the mapped file.-
ACCESS_READ: Read-only access. -
ACCESS_WRITE: Read-write access. -
ACCESS_COPY: Read-write access with private copy-on-write semantics.
-
-
offset: The starting offset within the file to begin mapping. -
tagname: A name for the shared memory object (used for inter-process communication). -
flags: Additional flags for customizing the mapping.-
MAP_SHARED: Create a shared memory mapping (visible to other processes). -
MAP_PRIVATE: Create a private memory mapping (not visible to other processes).
-
-
-
mmap.mmap.close(): Closes the memory-mapped file object, releasing associated resources. -
mmap.mmap.flush(): Forces all changes made to the memory-mapped file to be written to disk. -
mmap.mmap.read(n): Readsnbytes from the memory-mapped file. -
mmap.mmap.write(b): Writes the bytesbto the memory-mapped file. -
mmap.mmap.seek(pos, whence=0): Sets the file position indicator to a new position within the memory-mapped file. -
mmap.mmap.tell(): Returns the current file position indicator.
Practical Examples
1. Reading and Writing to a Memory-Mapped File:
import mmap

# Open the file in binary mode
with open("data.txt", "r+b") as f:
    # Create a memory-mapped file object
    mm = mmap.mmap(f.fileno(), 0, access=mmap.ACCESS_WRITE)

    # Write data to the file
    mm[0:10] = b"Hello, world!"

    # Read data from the file
    data = mm.read(10)
    print(data.decode())

    # Close the memory-mapped file object
    mm.close()
2. Modifying a Large File:
import mmap

# Open the file in binary mode
with open("large_file.txt", "r+b") as f:
    # Create a memory-mapped file object
    mm = mmap.mmap(f.fileno(), 0, access=mmap.ACCESS_WRITE)

    # Find and replace a specific string within the file
    for i in range(len(mm)):
        if mm[i:i + 10] == b"old_string":
            mm[i:i + 10] = b"new_string"

    # Flush changes to disk
    mm.flush()

    # Close the memory-mapped file object
    mm.close()
3. Sharing Data Between Processes:
import mmap
import multiprocessing

# Create a shared memory object
shared_mem = mmap.mmap(-1, 1024, tagname="shared_data")

# Define a function to write to the shared memory
def writer(data):
    shared_mem.write(data.encode())

# Define a function to read from the shared memory
def reader():
    data = shared_mem.read().decode()
    print(data)

# Create two processes
p1 = multiprocessing.Process(target=writer, args=("Hello from process 1",))
p2 = multiprocessing.Process(target=reader)

# Start the processes
p1.start()
p2.start()

# Wait for the processes to finish
p1.join()
p2.join()

# Close the shared memory object
shared_mem.close()
Frequently Asked Questions (FAQs)
1. What is the difference between mmap.ACCESS_WRITE and mmap.ACCESS_COPY?
mmap.ACCESS_WRITE provides direct access to the file on disk, allowing modifications to the file’s contents. mmap.ACCESS_COPY creates a private copy-on-write mapping, meaning that any modifications made to the memory-mapped file are initially reflected in the private copy. Only when the memory-mapped file object is closed or flushed are the changes written back to the original file.
2. Can I use memory-mapping with compressed files?
No, memory-mapping is not directly compatible with compressed files. The mmap module requires access to the raw data within the file, which is not available for compressed files.
3. How can I determine the appropriate size for the memory-mapped file region?
The size of the memory-mapped file region should be large enough to accommodate the data that will be accessed frequently. However, it should also be kept within reasonable limits to avoid excessive memory consumption. You can adjust the length parameter in the mmap.mmap() function to specify the desired size.
4. What are the potential downsides of using memory-mapping?
While memory-mapping offers significant performance benefits, there are some potential downsides to consider:
-
Memory Consumption: Memory-mapping can consume a significant amount of memory, especially when dealing with large files.
-
File Locking: When using shared memory mappings, multiple processes may attempt to access the same file region. This can lead to file locking issues, especially if multiple processes attempt to modify the file simultaneously.
-
Compatibility: Memory-mapping is not supported by all file systems and operating systems.
Tips for Effective Memory-Mapping
-
Choose the appropriate access mode: Select the access mode (
ACCESS_READ,ACCESS_WRITE, orACCESS_COPY) that aligns with your intended usage. -
Use the
flush()method: Ensure that all changes made to the memory-mapped file are written to disk by calling theflush()method periodically. -
Close the memory-mapped file object: Remember to close the memory-mapped file object using the
close()method when you are finished with it. This releases the associated memory and resources. -
Consider using shared memory mappings: If you need to share data between multiple processes, consider using shared memory mappings to enhance inter-process communication.
-
Monitor memory consumption: Keep an eye on the memory consumption of your application when using memory-mapping, especially when dealing with large files.
Conclusion
Memory-mapped files in Python 3 provide a powerful and efficient mechanism for interacting with large files. By eliminating the overhead associated with traditional file I/O operations, memory-mapping significantly enhances performance, reduces memory footprint, and simplifies file manipulation. Understanding the benefits and potential downsides of this technique allows developers to leverage its advantages effectively while mitigating potential risks. By following best practices and considering the appropriate use cases, memory-mapping can be a valuable tool for optimizing file-related operations in Python 3 applications.


Closure
Thus, we hope this article has provided valuable insights into Memory-Mapped Files in Python 3: A Comprehensive Guide. We appreciate your attention to our article. See you in our next article!